Secure Webhook Delivery
Lock down your webhooks endpoint
Summary
Now that your server is configured to receive webhooks it will happily listen for any messages sent to the configured URL. The next step is to ensure that only webhook messages sent by Youmanage are allowed.
There are a couple of different ways to restrict incoming requests, such as filtering out any requests that do not come from the Youmanage IP address range, however this could be subject to change.
A more reliable way is to configure a secret token and validate requests against this token.
Configuring Secret Token
First, we need to add a secret token to a webhook.
To do this, navigate to the Webhooks management screen, found in Admin -> Integrations -> Webhooks, then either click the plus (+) icon to create a new webhook or click the edit button on an existing webhook.
On the following page enter a value into the Secret textbox. It is recommended that this be a random string with high entropy and can be generated using cryptographically random methods in the language of your choice.
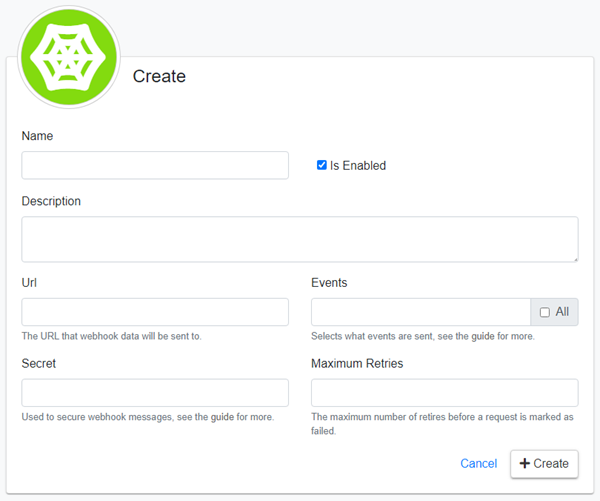
Click the Create button to create your new webhook, or if editing an existing webhook, changes are saved automatically.
Next, you will also need to save this token on the receiving server so that it can be used to validate incoming requests. The simplest way to do this is to add an environment variable which can be done using the following example:
setx WEBHOOKTOKEN your_token
Type this into the windows command prompt but change the term your_token for the token you created earlier.
Validating Incoming Requests
Once a secret has been applied to a webhook, Youmanage will then start sending an additional X-Youmanage-Signature header along with each request it makes.
This header contains a hashed signature of the contents of the request and can be used to validate that the message was actually sent from Youmanage.
To do this validation, you will need to follow the same steps to generate the hash and then compare that the two hashes are the same. Below is an example of how this can be achieved.
private string GenerateSignature(string content, string secret)
{
	var secretBytes = Encoding.UTF8.GetBytes(secret);
	var contentBytes = Encoding.UTF8.GetBytes(content);

	byte[] hashedBytes;
	using (var hasher = new System.Security.Cryptography.HMACSHA256(secretBytes))
	{
		hashedBytes = hasher.ComputeHash(contentBytes);
	}

	return BitConverter.ToString(hashedBytes)
		.Replace("-", string.Empty)
		.ToLower();
}
This example is in c# but the basic principle applies to any language.
The secret token is used to generate a SHA256 hash of the request body content and this hash is then compared to the hash transferred in the X-Youmanage-Signature header.
The last stage in this tutorial series is to look at the structure and contents of the different types of payloads that are sent to your server.